

The Porsche Cayenne 958 is more than simply a luxurious ride; it’s a performance-packed SUV sports car. And you know what truly sets this apart? This nasty boy’s brakes! They’re built to keep up with the Cayenne’s insane power and keep you in command no matter where you travel. Whether you’re navigating rough terrains or cruising on the freeway, these brakes have got your back, ready to bring you to a safe stop in a snap.
Racing isn’t just about hitting top speeds. Winning is also about knowing when to slow down and do it efficiently, especially at critical turns and corners. With the Cayenne 958, you get brakes that are up to the task, giving you that race-car level of precision and control.
So, what’s the verdict? Safety? Absolutely! Performance? You can bet it’s out of this world! Let’s now decipher the mysteries of the Porsche Cayenne 958’s brakes, where every journey is an adventure, and the brakes are just as exciting as the acceleration!

Braking Prowess of the Porsche Cayenne 958
The Porsche Cayenne 958 boasts excellent stopping power, allowing it to stand out in a crowded market of high-performance SUVs. The braking systems of competitors such as the BMW X5 and the Audi Q7 are excellent, but the Cayenne 958’s finely developed brake system is unmatched.
The BMW X5 offers strong braking capabilities, yet some drivers note a slightly softer brake pedal feel compared to the Porsche’s immediate and firm response. Audi’s Q7, on the other hand, boasts reliable and efficient brakes, but the Cayenne 958 edges it out with its ability to deliver consistent performance even under intense driving conditions.
The Porsche Cayenne 958’s dominance over its competitors is obtained through the use of two types of brake systems. The standard cast iron brakes and a sporty and fancy Porsche Ceramic Composite Brakes (PCCB). The race-proven PCCB is offered as an option for all Cayenne models, providing even superior braking feel and efficiency. It even helps to lower the Cayenne’s unsprung weight, which has an impact on how the car handles.
Different cast-iron braking systems are used on different Porsche Cayenne model levels. The front and rear brake rotors on the Cayenne and Cayenne Diesel are 350/330 mm in diameter and 34/28 mm in thickness. The brake rotor diameters on the Cayenne S, Cayenne S Diesel, Cayenne Hybrid, and Cayenne S E-hybrid are much larger, measuring 360/330 mm with a thickness of 36/28 mm.
The Cayenne Turbo, Cayenne Turbo S, and Cayenne GTS model trims have the largest brake rotors, measuring 390/358 mm in diameter. They also have the thickest brake front rotors, measuring 38/28 mm. These little variations demonstrate Porsche’s commitment to fine-tuning the performance characteristics of each model version to ensure excellent braking capability.
Fun fact: Ever noticed those colorful brake calipers on the Porsche Cayenne 958 and thought they were just for show? Think again! Those colors have some cool stories behind them. Let’s break down the color code for each Cayenne 958:
Black caliper (Base):
- Cayenne, Cayenne Diesel
Silver caliper (“S”):
- Cayenne S, Cayenne S Diesel, Cayenne S Hybrid
Red caliper (Performance):
- Cayenne GTS, Cayenne Turbo, Cayenne Turbo S
Acid green caliper (Plug-In Hybrid):
- Cayenne S E-Hybrid
Racing yellow caliper (PCCB):
- Any of the above model variants that are equipped with PCCB
And guess what? The Porsche Cayenne 958 models come with this cool Electronic Parking Brake (EPB)! Porsche didn’t use this just to make other things complicated. It is used to increase safety and convenience on your ride further! One of its functions is called the Drive-Off function, and this is how it works — when you’re ready to roll, simply tap the accelerator, and it’ll know you’re ready to cruise and release on its own — the seat belt needs to be fastened, of course. Neat, right?
Things to Notice on Porsche Cayenne 958 with Worn Brake Pads or Rotors

If you’re driving your Cayenne and suddenly notice that “brake pad worn” warning light glowing on the instrument cluster, don’t brush it off! That’s your car’s way of telling you that it’s time for some brake maintenance. But hey, sometimes we all miss a warning light or two, right? So, your car has other ways to get your attention.
Ever heard that unsettling metal creaking noise when you press the brakes? That’s another heads-up. It’s like your car’s way of saying, “Hey, buddy, remember me? Time for a check-up!” The worn-out brake pads rubbing against the rotors generate this noise. Not a sound you’d ever want to hear!
Furthermore, if your car isn’t stopping as smoothly as it used to, this is another indicator of worn-out brakes. Reduced braking efficiency can make your drives less safe and can be a direct result of worn-out brake pads.
When should I replace my brake pads on my Porsche Cayenne?
If your Porsche Cayenne’s brake pads have reached the minimum thickness (3 mm), they should be replaced. This normally occurs after 30,000 to 40,000 miles driven, or 3 to 4 years. Your driving habits and road conditions still determine it.
The difference between new and worn-out brake rotors is only 2mm. This means that the new front brake rotors on a Cayenne Turbo are 38mm thick and must be replaced once they reach a thickness of 36mm.
Unlike brake pads, brake rotors do not have a sensor to monitor their condition. So remember that this measurement should be done every now and then — usually, every service. Remember that there is no way to identify worn brake discs besides measuring them. Not unless you have a built-in micrometer in your eye, that is.

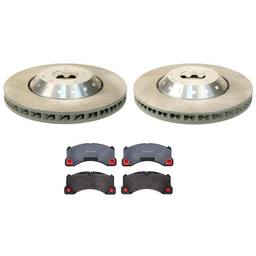
Replacing Brake Pads and Rotors on Your Cayenne 958
When considering a brake pad and rotor replacement, quality should be your top priority, but that doesn’t mean you need to break the bank! Stellar brakes not only boost your driving experience but are your car’s primary line of defense.
For top-notch braking performance without the hefty price tag, Brembo is a standout, and here’s a little secret: they even manufacture some of Porsche’s brake parts! They’re celebrated for their unmatched braking precision, ensuring every cent you shell out is a solid investment.
On the other hand, if you’re seeking another cost-effective choice, SHW delivers with both durability and efficiency. Sure, genuine parts are charming, but why not consider brands like Brembo or SHW? They not only match up in quality but also let you keep a bit more cash in your pocket. Smart investments lead to safer and sprightlier rides!
Right tools for the job
Before diving into this Porsche Cayenne 958 Brakes DIY project, it’s crucial to gather the right tools to ensure the task goes smoothly. A well-prepared toolbox can save you time, reduce frustration, and ensure the job is done correctly. Additionally, never skimp on SAFETY! Always wear safety goggles and gloves, and make sure your workspace is well-ventilated and risks-free. Remember that a safety-first approach combined with the right tools creates the framework for a successful and injury-free job.

- Working gloves
- Safety goggles
- Half face respirators
- OBD diagnostics tool
- Hydraulic jack rated at least 2 ton
- Jack stands rated at least 2 ton
- Inspection light
- Breaker bar
- Suction pump
- ½” torque wrench up to 200 ft./lb
- Torx bit Socket
- Triple square bit socket
- Caliper hangers (could be wire or strap)
- Flathead screwdriver with a metal-handled end
- Phillips head screwdriver with a metal-handled end
- Ball peen hammer
- Brake caliper expander
- Spring puller hook
- Anti-seize grease
- Brake grease
- Brake cleaner spray
- Sandpaper or wire brush
- Paintbrush 2”
- Disposable rags
Lifting the car and removing the wheels
Hey, check out our article on the lower control arm. We have added extensive information on this, so you might want to go there and learn more about your precious ride besides lifting up your car and removing the wheels safely.
Removing calipers
Now that the car is up and stable, we can begin removing the brake calipers. But first, we must take some precautions to guarantee that everything is done securely and properly.
The first step is to open the engine hood and remove the left cowl panel cover, then locate and check the brake fluid reservoir for level. If it is full, reduce the brake fluid until it is almost empty. This is done so that when we press the caliper piston backward, the brake fluid will not overflow from its reservoir. Take note: brake fluid is corrosive to paint, so be careful. We don’t want to damage the paint of your beautiful car.

Next, grab a screwdriver and pry the brake pads away from the rotors. Take note, doing this in cast iron rotors will not have any issues, but DO NOT, in any case, do this in a PCCB rotor. Though ceramic rotors are harder than their cast-iron counterpart, they are also very brittle. Any uneven force done in its weak point can result in chipping, rendering it damaged. To do this safely on a PCCB, you can use a plastic strip that is thick enough to spread the force you exert on the rotors when prying the pads backward.
To remove the front brake caliper, you should disconnect the brake pad sensor wire and unclip it from the inner brake bleeder screw. Then, you can remove the caliper from the wheel hub carrier by unscrewing the 2 bolts. They can be really tight, so make sure to use a breaker bar first. Depending on the model, it can be a Torx or a Triple square screw. Once removed, use a galvanized wire or a strap to hang it on the upper arm. Just make sure it is done safely to prevent scratches.
To remove the rear brake caliper, detach the brake pad sensor connector, twist the other end of the connection 90° and pull it out horizontally. After that, you should loosen the 2 bolts on it using a Triple square bit socket. Once done, just hang the caliper again on top of the brake discs or in the lower control arm, and ensure it is secure and won’t fall off.
Replacing worn parts and installation
Got the calipers separated from the wheel hub carriers? Sweet! Wear your respirator, and we can now replace the worn-down parts. Let’s start on the front.
Front brake rotor replacement
To replace the front brake rotors, you must remove the Torx screw that attaches the brake rotors to the wheel hub. The rotors can be seized in some cases, so a few love taps can help to dismount them.

Front brake pad removal
For the front brake pads, you must secure the caliper first for you to work on this easily. A small stool or an upside-down bucket can be placed near the caliper and used as a small working table. Once it is on top of your makeshift work table, you should use a brake pad expander to reset the caliper piston. After the reset, you can now remove the worn brake pads and the retainer springs.
Rear brake rotor replacement
Next step? The rear brake rotors! To do this, you will have to remove the Torx screw that holds the rotors to the hub and use a triple square bit to remove the inspection screw as well. Once done, the rear rotors can now be removed. If it is seized, a few knocks with a hammer will unseize it. If by any chance it is not coming off, use an OBD diagnostics tool to put the EPB into service mode. Once done, the rear brake rotors should be coming off easily.
Parking brake shoe replacement
Once removed, you can now inspect the brake shoes for your parking brake, take note if it is still holding up, and if it still has enough thickness. Replace them if they are cracked, as this can cause a fault in your EPB. Replacing them is a straightforward job. Just undo the springs and install the new brake shoes. Just ensure the adjuster and springs are oriented like when you remove them. Installation will be a breeze using a spring puller hook and a bit of oomph!

Rear brake pad removal
To replace the rear brake pads, make sure to use the brake pads expander first before removing them. Once they are reset, you can now remove the brake pads. Take note that the pad that has a sensor on it will be stuck due to the retainer spring. Remove the spring first to remove the pads completely.
Preparation for installation
Before installation, use a brake cleaner spray and a paintbrush or rags to clean the calipers. Then, coat the guide post and retainer springs that have contact with the brake pads with brake grease to ensure squeal-free braking.
You do remember those rusty hubs, right? You shouldn’t let them spread; use a wire brush or sandpaper and brake cleaner spray to clean the hub off rust and dust. Then, apply a thin coat of anti-seize on the hub. This is done to make sure that the next removal will be easier and to prevent rust build-up.
Brake caliper installation

Before we install the caliper, we have to install the hardware and brake pads first. To do this, install a new retainer spring on the caliper. Next to install are the new brake pads. Then, install a new sensor on the inner pads of the caliper, making sure that the thicker side of the sensor is on the same side as the friction surface of the pads.
Once done, you can now install the calipers into the wheel hub. Make sure that the brake fluid lines are not twisted, and always use a new bolt that is torqued at 104 ft/lb for the front and 63 ft/lb for the rear!
That’s it! New brakes are now installed! Just make sure to top up the brake fluid to the maximum level and press the foot brake a couple of times to make sure that the brakes are now working as they should be.
Electronic Parking Brake calibration
Now, if you have replaced either the rear rotors or brake shoes, you will have to do a calibration of the electronic parking brake. This is done using an OBD tool, so just follow the procedure on it. This procedure is primarily done to ensure that the shoes are bedded in properly to the rear brake drum.
How much does it cost to change brakes on a Porsche Cayenne?
Replacing all brake pads and rotors DIY style on your Porsche Cayenne 958 can cost from $650 to $1000 on parts, depending on the model. If you are to let your local Porsche Dealer do this, you will have to shell out $2500 to $3000. Doing it yourself will really help you not to break the bank!
Now, if your car sports PCCB, those prices will change dramatically! You are talking about almost $20,000 just for the brake pads and rotors price alone. However, you don’t have to worry as the PCCB rotors take a long time to wear down if you only drive your car normally and do not abuse it. Some reports suggest that they last north of 200,000 miles!
Find the Best Brake Parts for your Porsche Cayenne 958!
That’s a wrap! Fellow Porsche Cayenne 958 enthusiast! Making sure your ride stops on a dime is just as thrilling as that acceleration rush, right? With the maze of brake parts out there, finding the ideal fit can feel like a puzzle. Don’t sweat it! At eEuroparts.com, we’ve got your back. Dive into our hand-picked selection and discover top-notch parts without breaking the bank. Keep that Porsche feeling awesome and your pockets happy. Cheers to more safe and spirited drives ahead!

