

Regular maintenance can go a long way in prolonging your car’s service life to several decades, way past what the manufacturer has intended for. Even then, parts break. Figuring out which parts broke is made somewhat easy in modern cars thanks to check engine light codes to interact with your vehicle and diagnose issues.
The P0161 code is one most people will see as car owners at some point. It has to do with your O2 sensors and should be a cause for concern.
We will aim to guide you through diagnosing and fixing this code. We will dive deep into the source of the issue, hoping in the end, you will get back on the road in the best condition possible.
What is the P0161 Code, and What Does It Mean?
The P0161 code stands for “O2 Sensor Heater Circuit Malfunction (Bank 2, Sensor 2)”. As much as the P0161 code is a generic trouble code, it is very specialized. It is specifically related to the heater circuit of the O2 sensor. The “Bank 2” part of the code’s description means that this code only applies to vehicles with a V configuration engine and Inline 6 engines.
The “Sensor 2” part tells us that the O2 sensor causing the issue is the one located after the catalytic converter, as there is also one upstream from the cat.
There are other odd configurations like the W12 and the VW VR6, but we will focus on the more common ones. An inline-4 engine will have one bank of cylinders and 2 sensors.
What Is an O2 Sensor, and How Does It Work?
The purpose of an O2 sensor is to relay the oxygen content of the exhaust stream back to the ECU. The downstream sensor we are looking at is responsible for verifying the catalytic converter is operating correctly.
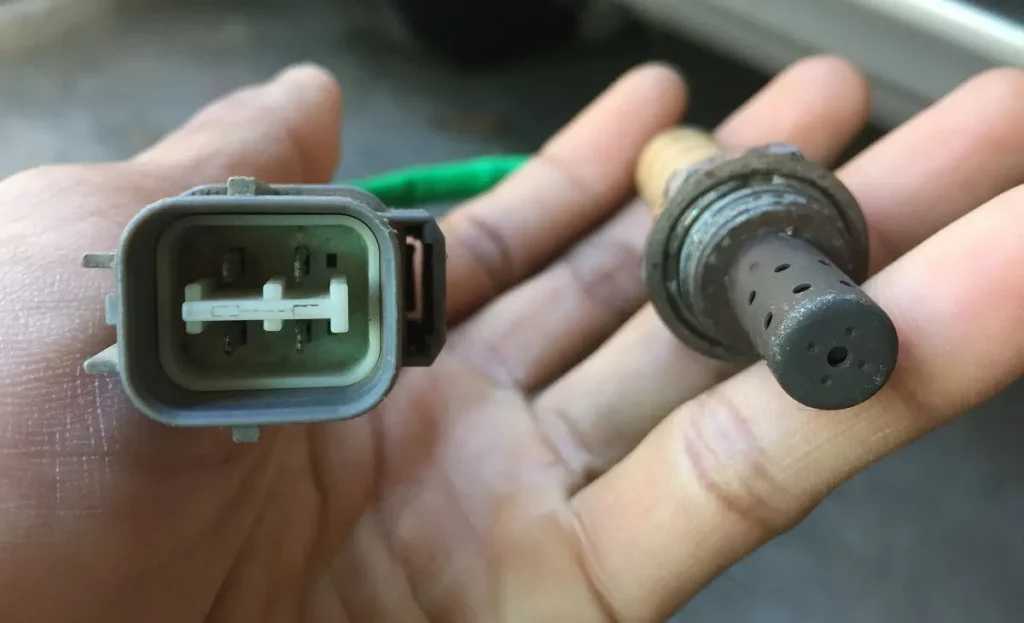
It uses a zirconium bulb with two platinum strips on its outside. When exposed to hot exhaust gases, the O2 sensor generates a voltage of between 0.2V and 0.8V. When something goes wrong with the internal components of the O2 sensors, you’ll start running into codes.
What Causes P0161 Code?
As this code relates explicitly to the heater circuit of O2 sensor 2, only a few issues can cause failure. However, O2 sensors fail progressively rather than immediately. This is a purposeful design as you would rather experience a reduction in performance than being stuck on the side of the road because of a sensor issue.
Those are:
- Downstream oxygen sensor failure
- Faulty ECU
- Heater circuit issue
- Sensor contamination
Downstream Oxygen Sensor Failure
Of course, the sensor itself can fail. Catastrophic failure in an accident or a voltage short can melt or damage the inner components of the sensor. This is a common cause of the P0161 code.
Heater Circuit Issue
This is by far the most common reason an O2 sensor fails. Like any heater element, it eventually shorts and needs replacing. Pre-1992 vehicles do not use heated O2 sensors. That being said, focusing on the most common issue that triggers any code is a great way to develop tunnel vision when diagnosing the CEL. It’s a good idea to always have that in mind.
Sensor Contamination
The sensor’s exposure to exhaust gases leaves it particularly vulnerable to engine issues. Issues such as a leaking head gasket, rich running condition or exhaust manifold failure can present on your O2 sensor tip.
Typically, the white color of the sensor tip indicates a head gasket issue, corrosion means that antifreeze has probably leaked into the exhaust stream, and a blacked out sensor means your engine is running rich.
Faulty ECU
This is the rarest of the P0161 causes. Simply because software issues are patched in a recall and the ECU is protected against electrical damage. However, even in the best of cases, ECU failure can still happen. Many other codes are present along with the P0161 when this happens.
What Are the Common Symptoms of P0161 Fault Code?
As the trouble code specifically states there is an issue with the heater circuit, you almost immediately know where to look when there is an issue.
- Check engine light
- Lean running condition
- Reduced performance
Check Engine light.
You can always count on your check engine light illuminating when you have any issues. For the P0161, the light will flash when the sensor fails, indicating an imminent issue that needs your attention ASAP.
Lean Running Condition
The downstream sensor relays emissions information. When an increased level of emissions is escaping from the tailpipe, the sensor will relay the air-fuel mixture should be leaner. A lack of fuel pressure or failed injectors can also cause.
Reduced Performance
Consequently, a lean running condition will reduce engine performance. Running an engine lean can also cause a number of serious issues such as engine knock. That’s why the P0161 code is definitely not one that you want to ignore for long. In fact, you shouldn’t ignore it at all.
How to Diagnose and Fix the Cause of P0161 Code
As the causes of a heater circuit issue are limited, the diagnosis process is fairly straightforward. You’ll need simple tools, an OBD II scanner and a way to safely get under the car.
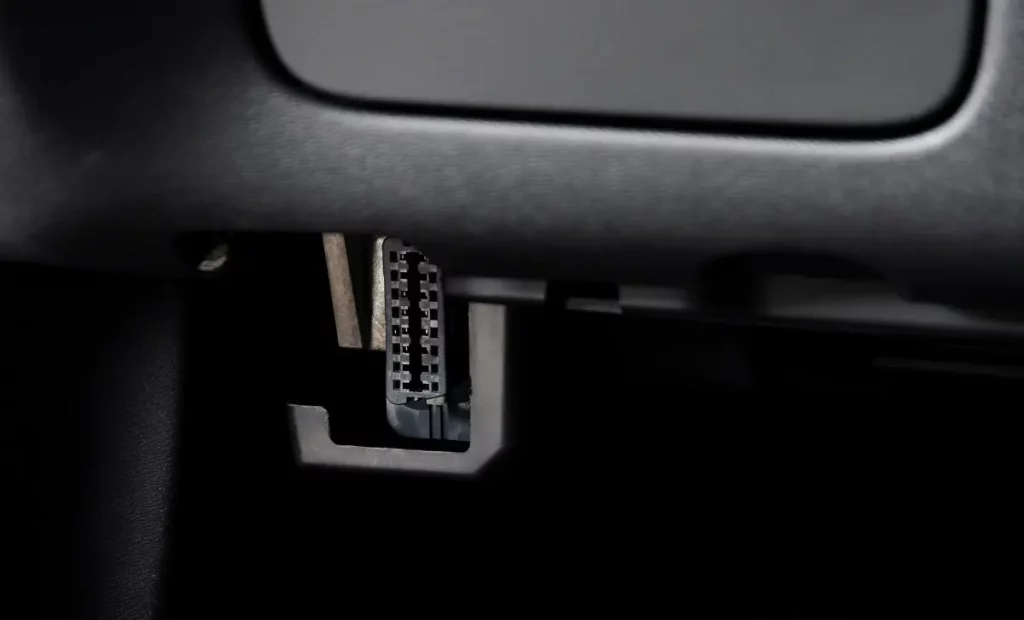
ODB II Reader
A check engine light on the dash means one thing — you’ll need an OBD II scanner. Running a full scan should be the very first thing you do when diagnosing any CEL issue. You can get one of these for cheap these days. Since the ODB II system of reading faults from the engine computer has been out for so long, they range from inexpensive DIY options to professional grade.
Luckily, you won’t need a professional scan tool to diagnose a P0161. Once you have it in hand, plug it into the ODB II port. Consult your owner’s manual for the exact location of the port. There could be more than one code, but at least now we can move on to more conclusive diagnostic techniques.
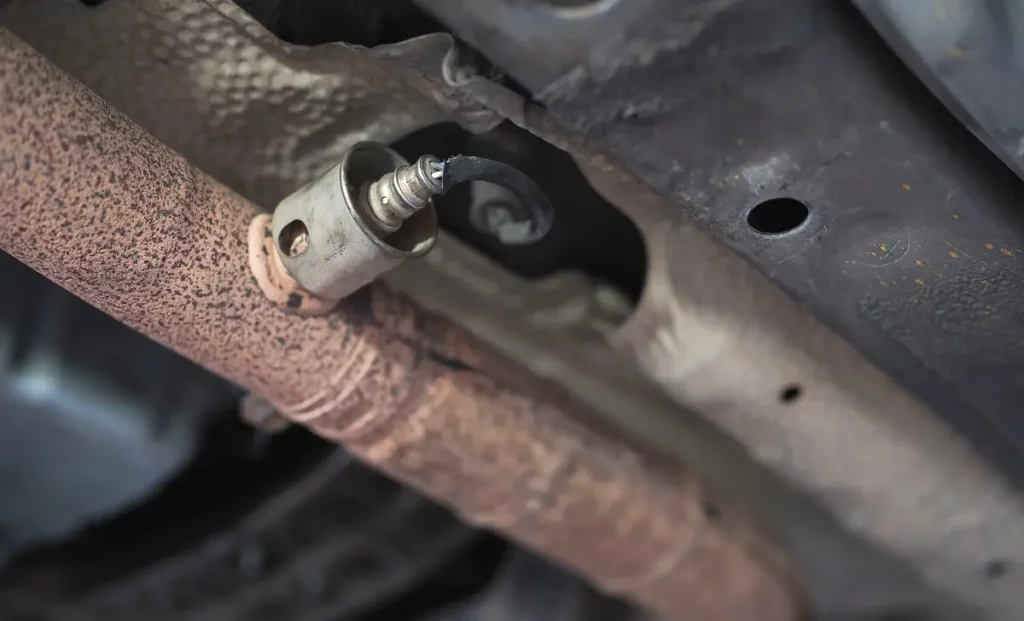
Visual Inspection
Visual inspection will help you ascertain whether there is any external damage to the sensor or wiring. When a heater circuit fails, there are usually signs of burning near or on the sensor.
Melting, loose connectors, or broken wires are indicators of a heater circuit failure. Pay specific attention to the 2 heater wires. Most modern options use a 5 or 4-wire system for the O2 sensor.
An issue with these sensors is they don’t fail outright, but reduce performance because of contamination. Long-term exposure to exhaust gases and the way manufacturers design them to function even at reduced performance means it’s difficult to diagnose.
Additionally, if there is a break further in the wiring harness or internally, you can experience a heater circuit issue. However, the most common failure point of a wiring harness is where it attaches to the connector, as the rest of it usually has an outer sheath.
Relay Test
A multimeter is your saving grace when it comes to this issue. O2 heater elements are resistance-based. They also operate using a relay and a fuse because of the high current required to produce heat.
We will start by testing the relay and fuse before moving to the sensor. On the relay, there should be a power rating. That rating is the voltage that it should switch the 12V it receives from the battery to.
Your vehicle should be in the key-on-engine-off state before conducting this test. Use the red (positive) multimeter probe to contact the relay and the black probe to contact any metal on the car (ground). The number differs between manufacturers, but your multimeter reading when probing should not be lower than 12V.
Heater Circuit Test
Now we can move on to testing the resistance of the heater circuit. Set your multimeter to ohms. The heater wire configurations differ slightly, so make sure you use whichever one your specific sensor uses.
Similar to the relay test, contact the positive probe with the positive heater wire and the negative probe with the negative heater wire. The internal resistance on a cold heater circuit is around 10 to 20 ohms.
Of course, there is a more DIY method of testing a heater circuit. However, keep in mind that this is a fairly invasive way to test the heater component, so proceed at your own risk.
Clip the wiring harness from the connector (don’t worry, you can always strip and reattach it) and separate the two heater wires. You must identify the correct wires when removing and reconnecting them, as it can damage the circuit if done incorrectly.
This method involves powering a light bulb with the heater circuit. The light bulb replaces this heater itself and allows you to see if it is damaged. Hook up your bulb to the loose connector and the remaining power wires. You can use the existing tail light connection for this as well.
If your bulb is on when the vehicle is in the key on engine off state, the circuit is faulty. If not, run your engine at idle, the bulb should turn on. It should turn off as soon as the engine turns off. If it doesn’t, there is a short to ground.
Fix the Cause of P0161 Code
Sometimes, cleaning the sensor or fixing a break in the circuit fixes the problem. Replacing the sensor is an option, but often, there is an underlying engine issue that is causing the P0161.
Some of the common issues that you need to solve are vacuum leaks, gasket failures, and cracked cylinder heads. In that case, there will be other more pertinent symptoms, and you will need to address them accordingly
Does P0161 Clear Itself?
Replacing an O2 sensor is easy, actually getting rid of the code is more difficult. The heater circuit usually synchronizes with the ECU, so it needs to reconfigure when replaced. The upstream and downstream sensors work together, so they have to be replaced in pairs.
Some ECUs only clear the code within 60 to 70 drive cycles. It is best to clear it with an ODB II reader. However, the code may disappear and reappear.
To prevent this, you need to start (key-on, engine-off) your vehicle while the sensor is disconnected, for the codes to appear. You can then reconnect the sensor and clear the codes.
Is It OK to Drive with P0161?
The chances are that you have been driving with this issue for a while. It’s only truly noticeable when the whole O2 sensor fails. You should check your O2 sensor every 10000 – 20000 miles, as this issue can cause a host of performance issues and can eventually lead to sensor failure.
Use Quality Parts to Fix P0161 Code
For many people, their vehicle is their livelihood. As such, it can’t be offline for long or frequently. Here at eEuriparts.com, we feel that the best way to keep your car reliable is to repair and maintain it using quality parts.
The same goes for fixing hte P0161 code. Our catalog of products includes a wide range of genuine, OEM and quality aftermarket parts for various European vehicles. We work with some of the most reputable brands in the business to bring you nothing but the best.
